Puttygen authorized_keys linux
 Generally it is not secure to allow remote root login. Additionally, using Password Authentication is also insecure. So… after setting up my server at RackSpace, the next step was to setup basic SSH login security.
I’ve had great success using RackSpace Cloud Servers, they are easy to setup and use (like this one, most of my linux based guides will use a Rackspace Cloud Server as a starting point). I will assume you have your server started and you are ready to begin at the command prompt. This guide uses an install, but these steps will work on most other Linux distributions.
Securing SSH Login
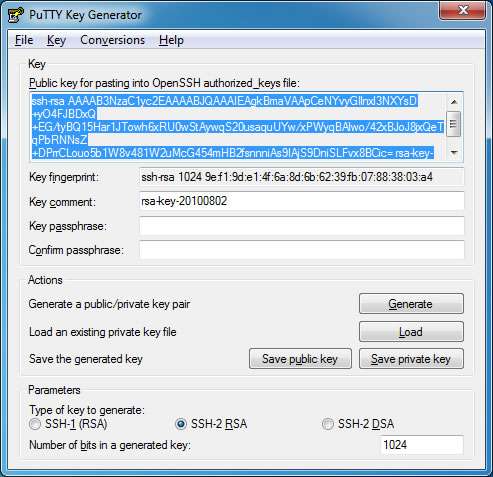
We will be using Public Key Authentication, so our first step will be to generate a public and private key. I recommend using .
- Open PuTTYgen and click the “Generate” button
- Move your mouse (PuTTYgen uses random mouse movement to generate a public and private key)
- Enter in a “Key Comment” (this text will appear each time you login via SSH, something like “Authenticating with public key: YOUR KEY COMMENTS”)
- Keep the PuTTYgen window open…
Before we get ahead of ourselves, we will need to create a new user account:
useradd -s /bin/bash -m yourname We will also add this user to the sudoers list, open up the sudoers file with the following:
 visudo
Now find and change the following line…
visudo
Now find and change the following line…
root ALL=(ALL) ALL to…
root ALL=(ALL) ALL yourname ALL=(ALL) NOPASSWD: ALL Save the file by: pressing CTRL+X then typing “y” and pressing RETURN … or similar depending on the editor used.
The above gives the yourname user all sudo privileges and will also not require the user to enter a password each time they try to use a privileged command.
If you’re working in a public space, you may want to always be prompted for a password when you use sudo. To do this, just remove NOPASSWD:. Remember, you must also set a password for the yourname user account with the following command:
passwd yourname Create a .ssh directory in the yourname user home directory (this is where the authorized_keys file will be stored).
mkdir /home/yourname/.ssh At this point, we will be using vim to create/add the public key to the authorized_keys file, so here is a on using vim.
Open files with the following command:
vim /path/to/the/file Once you’ve opened a file, enter editing mode by pressing i. You will now be able to make changes to the file.
Use the directional arrows on your keyboard to navigate.
When you are finished editing press ESC, this will exit the editing mode. To save the file enter :wq (write and quit).


